Friday, January 30, 2015

#FrostedPumpkinFriday: Off to a Slow Start

So here is this week's #FrostedPumpkinFriday update of the Frosted Pumpkin Stitchery's 2015 SAL, Story Time. I didn't get very far this week {hangs head in shame} but that's because my mom asked me to help with the planning of the 2015 Rocky Mountain Quilt Festival, which her company Bear Thread Designs, just took over the management. I am super excited that I get to work with all of the vendors who will be participating. {YEAH!!}

Hopefully next week I will have a better chance to get some work done, but it is really exciting!


I’m excited to post weekly updates here at The Teacup Collector’s Cottage. I would love to see your progress as well. Feel free to post a picture or link to your project. Just remember, out of respect for the designers, please do not post photos of any part of the pattern.

Until our next cup of tea … 


Wednesday, January 28, 2015

The Lion Made Me Do It!!

Oh, no! I started something new. Yikes!!

On my birthday I stopped by the craft store in between lunch and picking up Lil Monkey at school. I wasn't planning to buy anything, I just wanted to stop in a look at stuff. I walked through nearly 3/4 of the store and wandered into the yarn section. I saw this beautiful steel grey bulky yarn and fell in love.


Now, the reality is that I haven't picked up a crochet hook in probably 20 years. I am a hopeless cause. I've had 2 grandmothers and 1 great grandmother try to teach me to crochet at some point in my life from an early age to the teen years. I cannot read the patterns to save my life!! Seriusly, I am horrible at foreign languages and this is all Greek to me!

I couldn't pass up the grey yarn and grabbed a hook as well.

The yarn, Lion Brand Yarns, was a beautiful bulky yard called Edwardian. 


So once I got home, it sat near my recliner for a few days while I tried to figure out what I wanted to make. After playing around a bit, and searching on Pinterest for a "magical" quick lesson for beginners, I decided to just go with the one stitch I know, the double crochet.

Right away, I started making a single crochet chain and by the 40 count-ish I'd lost track. Oh, well, I just made a really long chain and started double crochet from there. By the end of the night, I had almost finished the skein of yarn.


I worked on it a little more today, after picking up two more skeins of yarn. I'm surprised that it is actually going well as this point. I'll update more next week and we'll see how far I get.

Until our next cup of tea ...


Monday, January 26, 2015

A Weekend Project: Playing with Pinwheels

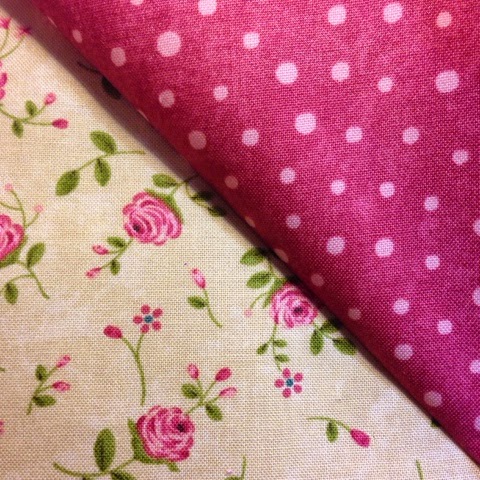
This weekend I wanted to work on a quilt project, but was really not inspired to work on on anything I had on the table, so i looked around for a quick project. Usually, that means that I dig through my bin of Quiltsmart ZigZapps!, but this time I pulled out two Rambling Rose by Moda charms packs I'd gotten at their end og the year sale. It was just enough to do something new and small enough to finish.

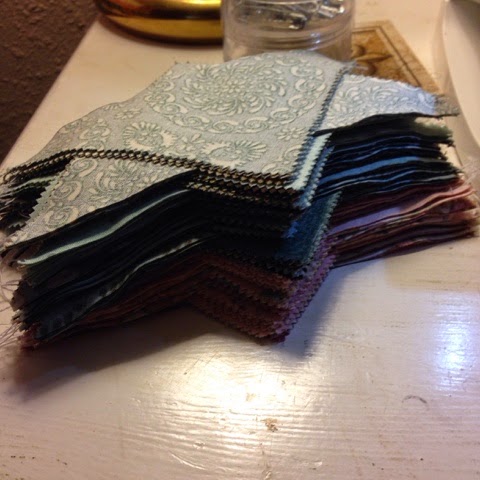
I perused my quilt pins on Pinterest and decided to finally get over my (irrational) fear of triangles, so I decided to do a pinwheel table topper. I sorted through the teals, pinks, brown and tan 5-inch squares and matched them up to make pairs for the pinwheels. I paired each pink with a tan and each teal with a dark brown. I had two 5-inch squares of each fabric and matched the same fabrics together. 

I know that pinwheels are easy, but just in case you haven't made any, here is the simple method I used.


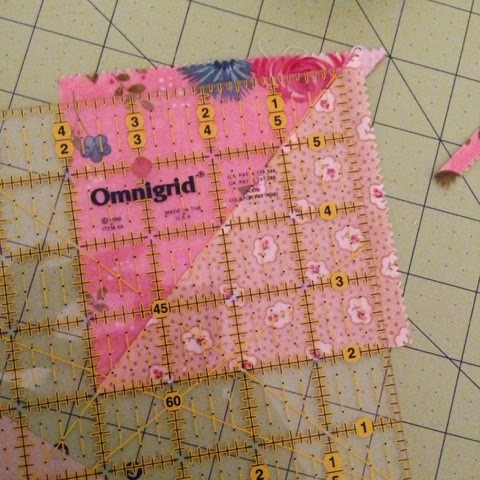
First, I flipped over one in each pair (the pink or the teal) and drew a diagonal like from top to bottom like this.


Then I pinned each marked square with its mate, right sides together, on either side of the line.


At the sewing machine, I used the line as a guide and sewed 1/4 inch on each side of the line. After each one was sewn on each side of the line I cut the pairs apart on the line, creating two half-square traingles, a little larger than 4 1/2 inches each. (Not shown.)


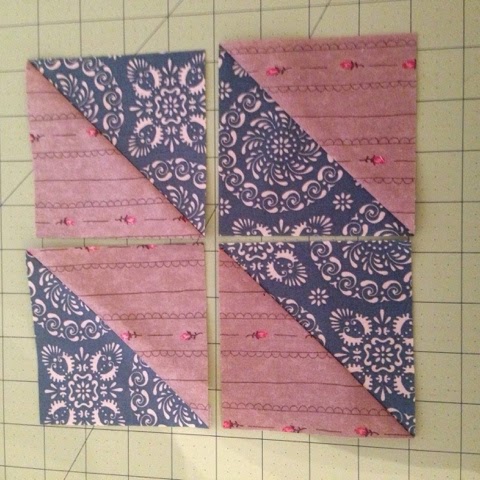
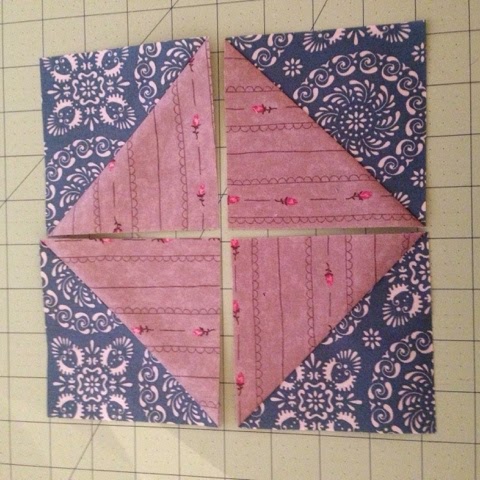
Afterwards, I had 4 half-square traingles of each of the fabric pairs.


I trimmed each one down to the next half-inch. Unfortunately, I was watching my little guy play in the back yard and cutting the squares in front of our big picture window and cut a few sets at 4-inches before realizing my mistake, so then I just made all of them 4-inch squares.


Once I had the sets of half-square triangles, I flipped them all sorts of ways to see what my choices were, but this time I stayed with my original plan and decided to make pinwheels. 


I sewed them together and soon had 16-pinwheels ready to be put together. 


I'll show you the finished tabletopper later. I am hoping to use it for a feature story I am writing for TEAinTEXAS' summer issue.

This was a quick and easy project. If it wasn't for our sewer line breaking, unexpected out of town family stopping by for a visit, vehicle maintenance and birthday dinner out with friends, I would have been able to finish it in one weekend!!

Until our next cup of tea,


Friday, January 23, 2015

#FrostedPumpkinFriday: the Cold (Old) Hard Facts


Its #FrostedPumpkinFriday!! I am so excited about this new SAL, Story Time Sampler, by Frosted Pumpkin Stitchery. I didn't get as much done this week as I'd hoped to accomplish. I was hoping to get some stitching in today, but the TEAinTEXAS magazine has seen some growth this year and our 2015 issues are going to be the biggest one's yet! It's exciting, but with extra feature writing and last minute client additions, I didn't get to sit and stitch much. 

I've gotten a little further than this, but still not finished with the first frame yet.


Starting this project did make me face reality. I've been working on another project, my carpool project, on a high count thread fabric. I think it's a 28-count white eventweave and I'm stitching over 2. I work on it mostly in daylight (carpool) so I hadn't really noticed any issues. But when I started on this project with the "Storm" by Picture This Plus, the light grey and muted or pastel tones of the floss, I soon realized I'm going to need either glasses or a magnifying glass. UGH! I feel old. Two years ago at 35 I was told I needed glasses, but somehow this makes me feel old. Sure, I'm suppose to wear my prescribed glasses when I read, am on the computer, sew or stitch, but this just makes me feel so ancient. Well, that and my birthday was yesterday and there were a few old jokes.

But there is a happy note. I am absolutely, head over heels in love with Picture This Plus. From their site, you can see they have lots of selection and each one is gently dyed in small batches and the best part? They stitched the sides of my fabric piece so it wouldn't unravel!! Now, I'd like to believe I am special, but I'm pretty sure they do this on all their fabric cuts. But I still feel special.


I love the varigated patterns that turned up in my 1/4 yard f Storm. The greys are very beautiful. 


Well, I'm off to get some more stitching done before bedtime. Show me your Frosted Pumpkin Project! It doesn't have to be from the Story Time Sampler.

Until our next cup of tea ...

Thursday, January 22, 2015

Exploring Something New: Birthday Lunch

Today is my birthday and as it happens to also be a Thursday, the office is empty except for me today. The publisher is working on the upcoming Spring TEAinTEXAS issue at home because it is storming like crazy here. The other staff are usually in the office on Monday, Wednesday, Fridays, so it's just me today. As luck would have it today, none of my friends work on this side of town eather, so I am spending lunch at The Teacup Collector's Cottage. It is not as sad as it sounds ...

I decided to try something new. Now I am not one of those super confident people who can eat lunch by themselves, but it has gotten easier. I usually work, or blog, depending on where we are wiith the magazine.

I was driving around trying to decided where I wanted to go, since I am usually just a comfort-zone kind of person when it comes to restuarants - but you if you can't be adventureous on your birthday, when can you? I saw a Sam moon store, a place I'd heard about for years from Lil Monkey's god-mother, Mindy, but I'd never been. I pulled in contimplating just going "window-shopping" instead of facing a lunch alone and drove past a place called SushiPop. I'm not going to lie at this point, I love sushi. Like a lot. Like get it made fresh at the local HEB almost every week. I, seriously, love sushi.

I pulled in and like any chicken, Googled it to see the menu so I wouldn't look like a dork when I went in. The menu is amazing. Traditional sushi, specialty sushi, bowls, soups, etc. Contrary to my first (humorous) thought it is not sushi on a stick like cake pops, but there's an idea ...


So I go in and explain at the counter that it was my first time there and she asked what I usually eat. Well, a favorite is the philly roll, a salmon, avocado and cream cheese sushi roll. She suggested I try to Pop This which is the same roll and fried, sort of like an egg roll. Egg roll? I'll try that!


A few minutes later I was brought this little plate of heavenly yumminess! (sorry, its a little blurry, but I was excited to try it!) It was soft, but crunchy. I don't know how to explain it. The sauce was like this spicy creamy goodness. Trust me, it was good!


The restaurant itself was nice too. Very modern, very clean. The staff was extremely nice. 


I even ate it with chop sticks. Look at me just jumping in all traditional like. Sushi is probably the only thing I can eat with chopsticks and not look like a messy Marvin. 


All in all, I overcame my hesitation and trying something new was totally worth it! I may have to see if the publisher knows about this place. It's really close to the office, so she may have been here before, but if not, I think we may need a field trip!!

Until our next cup of tea ...


Wednesday, January 21, 2015

Lego and Have Some Creative Fun!!

Hello All! Well, I have clearly been away for a few days, but it's because I was working on a fun project ... or two. First of all, The Lil Monkey decided that he wanted a Lego-themed birthday party this year. Unfortunately, there is very little Lego-themed party stuff, other than the Lego Movie and Lil Monkey prefers the Lego Marvel Superheros. After a little bit of searching, I found a rather simple plan for making invitations and thank you cards, so with a little creativity and digital cutting and pasting, I figured out something that he blessed with his approval.

You may have seen these before, and may have already figured out how to do it without step-by-step instructions, but here is what I did.

Step 1: First I purchased several sheets each of red, blue and yellow 12x12 scrapbook pages. Each page provided for 2 invitations with space for extra circles.

2: I cut each paper at 8 inches, then cut that in half at 6 inches.  The final pieces were 6x8 inches.


Step 3: I took the 6x8-inch pieces and folded it in half making the 4x6 inch invitations.


Step 4: Next i took the 4-inch strip that was left over from the original cuts and used my Fiskars 2-inch circle hole punch and cut out circles. You need two for each invitation, but there is enough to make extras. Save those for later projects.


Step 5: I added 3-dimensional adhesive squares to the back of the circles. I added two circles on the front of each folded invitation.


This is the final outside of the invitations. 


Step 6: I used stock photos from the internet and created the information for the party. I made them 3.5x5 inches so they fit inside. I also used a stock photo and made a photo to put on top. I printed them on 65-weight cardstock, but you may be able to print on photo paper. I then glued them to the inside of the folded invitation.


This is what my work area looked like by the time I finished.


I made thank you cards using the same techniques execpt I cut them at 4x6-inches and left them flat instead of folding them.

The invitations were a hit. Everyone loved them. Next I have decorations and gift bags, so I'll post those as I get them done.

Until our next cup of tea ...


Friday, January 16, 2015

#FrostedPumpkinFriday: Let's Get This Party Started

EEK! I can’t believe its that time already! I signed up a few weeks ago for the Frosted Pumpkin Stitchery’s Story Time Sampler Stitch-A-Long! The first pattern was scheduled to be released Jan. 15 (yesterday). I was so excited, I even set my calendar to remind me!


So yesterday, a little after 7 p.m. I logged onto my email to see what stitching happiness was waiting for me in my inbox.


Luckily, I waited until the Lil Monkey had eaten and was settled in watching TV with Daddy, because I opened it up and just like a favorite book, I was hooked!

So today, I officially start #FrostedPumpkinFriday on my blog. Last week my fabric from Picture This Plus arrived. It is a beautiful, hand-dyed grey 28-count Laguna in a light grey called “Storm”. I was in love when I opened the package. I’m a grey-and-pink kind of girl, so I was in heaven with this piece. Now the pattern called for a 1/8 yard cut, but I ordered1/4 yard when I saw the color.

I also picked up most of the DMC floss needed for the project earlier this week. The original was made with Weeks Dye Works, but the pattern provides the conversion numbers. I think hubby is less happy when I buy floss than when I buy stuff to start a new project, since I literally have containers of leftover floss from other projects. I guess that $.39 starts to add up in his mind.

I’m excited to get started on the project and even have a little more time that I thought because I recently decided not to go into the magazine office on Fridays. There are 2 computers and 3 desks, but have up to 5 staff members at any given time and with us blending and packaging teas on Fridays, a lot of the work space is used for orders and prepping for events. I can take a hint.

So it looks like on weeks I don’t have errands or meetings near the office and Lil Monkey’s school, I can be found at a nearby Starbucks sitting and stitching on this project. I may need to take donations for that … or alternate at the library. That’s kind of poetic, stitching on a Story Time Sampler at the library.  

I’m excited to post weekly updates here at The Teacup Collector’s Cottage. I would love to see your progress as well. Feel free to post a picture or link to your project. Just remember, out of respect for the designers, please do not post photos of any part of the pattern.

Until our next cup of tea … 


Thursday, January 15, 2015

The Heart of the Kitchen

OMG! We are only a few weeks away from Valentine's Day!! It's actually an exciting time for me because we recieved an early Valentine's Day present 5 years ago. Our Lil Monkey was born on Feb. 9, and then of course next week is my birthday so it's actually a bit of a whirlwind couple of months for us.

So of course, I'm getting an early start on pink projects!! 

On Saturday, I told you about an accidental project that I stumbled upon while making a mistake on this project. While I said I'd show the finished one of that one with this, I don't quite have it ready. Sorry, but hopefully, this makes up for it.

I wanted to make some quick projects and Quiltsmart ZigZapps! are the easiest way to do that, so I dug around in my stash and found some pink fabric and Sweetheart ZigZapps! A little stitching and flipping and I whipped up this kitchen towel!


A few friends have asked me if the Quiltsmart ZigZapps! are really as easy as I say. So let me walk you through how I do them.

First, I cut around the border of the ZigZapp! Then pin it to the right side of the fabric with the textured fusible side towards the fabric.


Then I stitch on the solid line.


I cut out the stitched piece on the dotted line, then carefully cut out the inset ZigZapp! if there is one. If there is a dotted line in the center, like the small heart, I cut on that line before sewing.


Then carefully flip the fabric so the rightside is facing out and the printed interfacing is on the back with the textured fusible side facing out.


I lay the turned piece on an Applique Pressing Sheet or Grip-n-Press by Bear Thread Designs with the interfacing on the craft sheet and iron it flat. This will prevent the fusible from transferring to my work surface.


Next I lay it on the background fabric and iron it down. The fusible will tack it down to the fabric, but depending on the fabric, like this textured towel I sometimes need to pin it.


Then stitch it stitch it down. Now, usually I stitch it to the background fabric with clear thread using a zigzag stitch, however this one I wanted to have a white stitched line show. The you finish your project as planned.


See, easy peasy! It took me less than an hour to make this, with 4 "life crisis" interruptions from a 4-year-old and taking pictures of each step. Now, it's your turn! Let me know when you try a project, I'd love to see it!

Until our next cup of tea ...