Showing posts with label Crafty Kid. Show all posts

Wednesday, February 11, 2015

Valentine's Treats, Simple and Sweet

Each Valentine's Day I try to do something special and creative for Lil Monkey's school mates. I'd rather do a simple craft with the Lil Monkey than to just buy stuff from a store, because my dad and stepmom didn't celebrate Valentine's Day when I was growing up.

In an earlier post, I showed you heart shaped colors we made for his school mates. Tonight I placed them in bags and added these cute stickers for him to pass out tomorrow.


Well also picked up a variety of chocolate for his 2 teachers and filled cute colorful flower pots with candy, a flower clip and this two-sided note ... 


I love that he scratched out "apple" and wrote in chocolate. Sometimes an apple doesn't make a teacher as happy as some sweet treats!

It doesn't have to be elaborate to be special.

Until our next cup of tea ... 


Saturday, February 7, 2015

Color Up Some Fun

Today my husband had class in the morning followed by drill at the Army base. I decided today was the perfect time to get the Lil Monkey and make Vanetine's Day treat for his school friends.


This year was a little harder, because he has a number of kids in his class with dietary restrictions. Some have allergies, but mostof them are cultural or religion-based restrictions. So this year, we decided to go the non-food route.

I'd see the melted crayons made from broken colors, so I thought that my nerves could handle him doing something that involved using the over because he will be 5 on Monday and has learened to stay away from the oven if I tell him too. In the past, my concern was that his curiosity would rule out and he'd try to peek.

The project itself was pretty fun, though not fast. The supplies included:
  • various colors of crayons 
  • small cups (for sorting)
  • mini muffin tin or non-stick baking cups
  • cooling sheet (Applique Pressing Sheet)

Step 1: First I seperated the colors in cups by color families. Reds, blues, organges, yellows, etc. 


Step 2: After the colors were sorted, I peeled the paper off and broken them into small pieces. Usually about 5 pieces for each crayon. The brand I used was Playskool colors. I was able to get 36-pack at Dollar Tree for $1 each. I used 4 packs and made about 45 pieces.


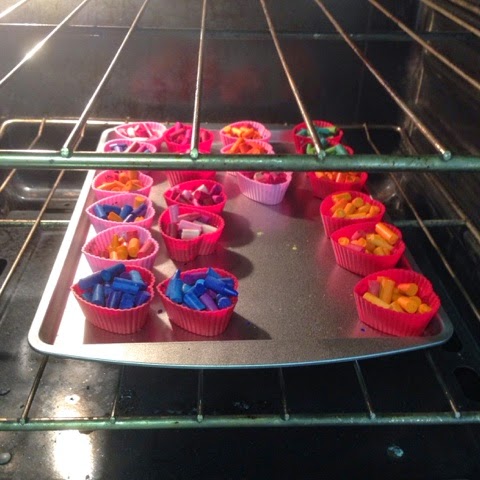
Step 3: The Lil Monkey helped layout our silicone heart shaped cups on a baing sheet and started filling them with the broken colors. Some were mixed colors, some were just colors in the same "family".  We filled the cups to the top because they lose volume once they melt.


He was faster than I was unwrapping them, so he started to play around. This was his sad face because he ran out of broken colors while I was unwrapping them. I guess I wasn't fast enough for him. He was playing around pretending he was going to eat them, then I hear, "Yuck! I think I actually ate some!" Ha! I was laughing so hard!


Step 4: After we filled all the cups we placed them in a preheated oven at 275 degrees for 10-15 minutes. Some of the cups were filled more than others so I checked at about 10 minutes and there was still some visible bumps and left them in a few minutes longer. It just depends on if you want them completely melted.


Step 5: After removing from the oven, we let them cool 30 minutes in the cups, them placed in the fridge for another 10 minutes. If you put them directly in the fridge to cool, the rapid temperature change can make some of the colors crack.

Step 6: We carefully removed them from the silicone cups. 

When we took them out of the oven they had a clear coat that I thought was water, but ince they fried, I realized from the nuted colors that it was the wax in the colors. Once we took them out of the silicone cups, the other side was brightly colored. 


As you can see, we made quite a few. 


The Lil Monkey was so excited with this project. I think we will definitely do something again soon, and this one is going in the books as a redo as well. Between the $4 for colors and the $1 Valentine's treat bags we put them in, we've had quite a budget-friendly project. I'll add stickers or cards with a note from him and be ready to pass out the treats later this week.

Until our next cup of tea ... 


Monday, December 29, 2014

Pinterest Project: We Need Alcohol for This!!

Yesterday, I posted about getting some creative time in with my friend, Erin. Though it was by far, our longest creative time together, it is not the only one on this trip.

On Friday, we were still trying to recover from our Christmas Day adventures (the wind picked up our canopy in the backyard and sent it flying though the kitchen windown when I was washing dishes.) After additional clean up and repairs, we rescheduled a gathering of #TheFourFamilies to Saturday and settled in for a quiet evening around our new gas firepit. Mike and Erin, who are staying down the street, walked over with their oldest to join us for some backporch relaxation.

Earlier on Friday, the hubby and I went to Lowe's with Lil Monkey to  pick up the gas grill and I got some plain white tiles so I could "trouble-shoot" the Sharpie Alcohol Art project I will be doing with my son's pre-K class next month. Sharpies and 4/5 year-olds is definitely something that can get scary fast so I wanted to have some idea of the project beforehand.

So when Erin came over, I enticed her to help me with the project. That's what good friends do, get you out of your comfort zone.


The premise seems pretty easy. Take multiple Sharpie markers and color white tiles with various designs then "drop" alcohol on it and watch them kind of melt together like a watercolor. Sounds simple ...
We had 4 color Sharpies ... black, red, blue and yellow. I thought the yellow wouldn't work, but we were surprised. After a couple of tries we discovered there were a few things that were not on the various instructions we'd found on Pinterest:
1. They don't really "melt" together without a little "dabbing" assistance. 
2. The red in particular was difficult because it tended to "float" and eventually just disappear.
3. Black was too strong and muddled everything into a black soupy mess.


The part we loved the most? You could rinse the times and remove the Sharpie and alcohol and start over, though we did have to wipe the ones with red with a little alcohol to get it all off. Not a big deal, and definitely a lifesaver since I'd only gotten 4 tiles. 


We each rinsed and redid our tiles 2 or 3 times, but eventually we got the hang of it. This is a photo of her tiles (top) and mine (bottom) when we left them to dry.


As you can see the red starts to fade away, but overall we were pretty happy. Unfortunately, it has rained to 48+ hours since then, so while they are dry, I have not been able to seal them with a Polyurethane sealer. From all I have read, it is best to use a spary versus a brush method so it doesn't distort the tiles. Hopefully, today the backyard will dry a little and I can spray them and post notes about the finishing step. I'll post another look at them as well, so you can see how they changed as they dried. 

Until our next cup of tea ...


Wednesday, December 3, 2014

Crafty Kid: Passing the Christmas Torch

Yesterday my husband had his first law school final for the semester, so he didn't get home until nearly 9:30 p.m. After dinner, the Lil Monkey started to get antsy, so I enticed him to clean up so we could make some Christmas ornaments for our holiday gifts (and a few for the tree). 

Now, I am a self-diagnosed with control issues when it comes to crafts and creative stuff for sure. So, I really have to remind myself that doing crafts with him does not have to be picture perfect or even make sense some times. It's about being creative and having fun. He's 4, so there is lots of time for people to put him "in a box" or give him parameters later.

Earlier this week, we had tried to make some reindeer ornaments but didn't get too far because he was getting frustrated with the glue no drying instantaneous! This time, we were making wreaths, from a prepared kit, just like the reindeers. This time, I set him up at the kitchen table, with all of the pieces sorted and said we were going to do an assembly line - I would tie the string on foam wreath and then he could glue the buttons on them. Later we would tie the bows and glue them on. He had no idea was assembly-line was, but said we were working like elves. Ok, elves it is. 

We got quite a few of them done in that last hour before bed time. He event invited his imaginary friends, Stella and Sam, to help us. Then he helped them with the glue and buttons later on so that they would have some ornaments too.


I guess tonight we may try to get some more done. It was fun working on this project and watching him decided what "patterns" he wanted to use for the red and white buttons. We talked about taking the "centers" that we pulled out of the middle and making about half of them Mickey Mouse themed, but we'll see. I'm not sure if he will want to put a photo in the center or not. I'll let him decide when we get to that stage.

While we are on the subject of kids crafts, the Lil Monkey also made these ornaments with my sister, Moo-Moo, when we were visiting my family last weekend. 


I encourage you crafty moms to include your children in activities. Sometimes it hard, I'll admit, because I want something to be perfect. But I always try to keep a spare project nearby so that if he does try to help on a not-so-kid-friendly project, I can give him something to do to keep his creativity inspired.

Until our next cup of tea ...