Showing posts with label Heartfelt Holidays. Show all posts

Wednesday, February 11, 2015

Valentine's Treats, Simple and Sweet

Each Valentine's Day I try to do something special and creative for Lil Monkey's school mates. I'd rather do a simple craft with the Lil Monkey than to just buy stuff from a store, because my dad and stepmom didn't celebrate Valentine's Day when I was growing up.

In an earlier post, I showed you heart shaped colors we made for his school mates. Tonight I placed them in bags and added these cute stickers for him to pass out tomorrow.


Well also picked up a variety of chocolate for his 2 teachers and filled cute colorful flower pots with candy, a flower clip and this two-sided note ... 


I love that he scratched out "apple" and wrote in chocolate. Sometimes an apple doesn't make a teacher as happy as some sweet treats!

It doesn't have to be elaborate to be special.

Until our next cup of tea ... 


Wednesday, January 14, 2015

History Has A Way of Repeating Itself ...

Have you even done a project and look at it later, thinking that you'd like to try it again? 

In 2009, I was working as a Family Representative for a military unit. When we hosted our annual Volunteer of the Year Ceremony, the commander wanted to give something unique to the so I decided to turn terra cotta pots into "baskets" for some of the items we had special ordered for the recipients. 

Earlier, I was looking through some of my old posts from my previous blog, looking for ideas for Valentine's presents for Lil Monkey's teachers and found this post. Here is what I did ...

Step 1: Chose the pieces you want. I used medium-sized terra cotta planters with saucers.


Step 2: Sand them to remove any ridges or rough spots, then wipe with a damp cloth to clean.


Step 3: Let them dry completely. Be sure to flip over so the interior drys as well. I let them dry for more than 24-hours.


Step 4: Paint them. I used 3 coats for the base, letting each dry at least and hour or two before adding the next one. Depending on the paint you can get creative and drag a dry-brush over the top coat while wet to get striping. 

Creative Tip: After drying, do secondary color. Try sponging a complementing over the top.


Step 5: After the pieces are completely dried, add accessories. I glued ribbon of the complementing color to the rim and then added ribbons.


It was a very easy project, but does take time for the drying. I'd recommend you add a clear coat once the paint dries for a shiny look and to protext from scratches. I did the pink one later in 2009 ... for me and used it to ho;d utensils on my kitchen counter before Army movers broke it in a move. I used an ordinary stamp to add the designs.  

Until our next cup of tea ...


Friday, December 26, 2014

A Creative Christmas

I am one of those people who get VERY excited about homemade or artistic Christmas gifts. I mean, yes, I did ask for a toaster this year and get one, but I really love artisitc gifts. This year I was surprised and actually turned into a kid in a candy store when our friend and neighbor Kevin brought over presents from him and his wife Jill. 

He came over at the point when my husband and a friend were fighting a reoccurring issue with our sewer line (it looks like a piece of the plastic pipe broke off and is causing a backup. He handed hubby our gifts and started talking to hubby and friend. I came out with the friend's wife at that time and Kevin asked if we liked crosses. Erin and I said "yes" and he came back with a shoe box sized box and dumped out a pile of beautiful crosses made from silverware. 


Erin and I were like kids in a candy store, but was still hestiant to take a whole bunch, but we each took 4 (well, I had already gotten one and got 3 more.)  He was like, "Is that all you want?" but we didn't want to be greedy. It sounds like they made a whole bunch, and they were certainly beautiful. I really loved these ...


He also gave us this beautiful license plate he made with our last name. I didn't even know he was creative - in this sense. He has done a lot of stuff around his house and rebuild my late father-in-law 1935 Harley Davidson. 


I get really excited when I find new creative friends, especially when they are longtime friends to begin with!!

Until our next cup of tea ... 


Tuesday, December 23, 2014

Buying a New Home for Christmas

In the 11 years that George has been in the Army, we have met some amazing people. Many of the spouses I've met who share a love for creativity have some really amazing and unique talents. My husband spent 5 years in his first assigned unit and I was surprised with how much time I spent with the spouses and families through 2 yearlong deployments that it was AFTER we moved to another military installation that I found out some of the creative talents some of the spouses I'd seen on a weekly baisi, if not more, had been keeping to themselves. O.k. it's not like they were hiding it, I just think many of them "developed" or honed their craft after we'd left.

One of those spouses. Maribel, was someone who I'd watched to learn more about being a military spouse. As a young wife, married to a newly commissioned officer, I knew that the impressions I made would be important. Maribel, the spouse of a senior officer was a great example of the poise, confidence and friendiness that I hoped to develop as I started this new life.

Though we didn't keep in close contact like some of the other friends I'd made in those firs few years, I did check in with her via Facebook a few times a year. It was a few years after we left that she introduced a line of decorative papercraft homes, chapels and other buildings that were the absolutely gorgeous. 

As you can imagine, life with an active toddler boy, I was a little nervous to order some of these delecate ornaments and such, so I put it off. Earlier this year, my husband bought me a china cabinet and when Christmas came around, I knew that it was the perfect time. 

In early December, my order arrived and I have to say, they were even more amazing in person than I'd seen on her website, White Berry Lane. I love that they can be personalized with names and such. I even requested all white to fit with my (future) Pink and White Christmas. It inspired me to make some more ornaments for that tree too, which I'll share later. 

I knew even before they arrived that there was no way I could put them away with the holiday decore, so with a little rearranging, they got a permanent home in the tea cabinet. 


Even the packaging is adorable and I was hesitant to unwrap them!


She also sent me this cute tea set photo which is also on display in the cabinet. 


Until our next cup of tea ... 


Saturday, December 13, 2014

Festive Fun with a Friend!

Today I had an alone-day. My dear husband was taking his last final of the semester and my parents were taking Lil Monkey to their community's Christmas parade. I attempted to get some long overdue house cleaning done, but then the craft store was calling my name. As soon as my neighbor got her kids and husband off to their respective activities, we headed over to JoAnn's to get supplies to make wreaths.

Now we've both been wanting to make Mickey Mouse holiday wreaths since our two families went to Disney together about 18 months ago. Her husband was more than ready for her to got get the stuff to get it done. My husband was used to my project fixations.

So off we went. The store is pretty picked over at this point and they are already putting out Valentine's Day stuff, but we found what we needed and about 2.5 hours later, this is what we had ...

Her wreath was a beautiful greenery wreath with ornaments and bows ...


Mine was a wire wreath with ornaments strung (and glued) to it. I filled in some of the empty spots after this, but forgot to take another photo.


All in all it was a fun afternoon, and something we'd nover done before. First we've never had a kid-free day at the same time, secondly she's never really done craft projects of this size before, but I think she is hooked now. She is already looking for Spring wreath ideas. I've created a monster!!

Another quick project I did was this vase. The case itself was 70% off because it had a chip in it. As a 
collector of the occasional chipped teacup, I wasn't deterred. The 4 berry branches were 70% off as well. I added some Epsom salt to the vase which I had at home. So for about $8 I created this fun centerpiece. (Later I found 4 more berry branches from a live wreath we had last year - 2 dark red, 2 gold.)


Another great craft adventure complete!!

Until our next cup of tea ...


Thursday, December 11, 2014

Accidental Chef: Christmas Gifts of Sweetness

This might be the most important post I ever write ... it's about making Pralines. I don't know much about the other 48 states, but in Texas and Louisiana this is one of the food groups. This isn't my recipe either. My sister-in-law posted it on her Facebook page earlier this month, hinting she'd like some. (Though she didn't want to have to wait until Christmas!!) Since my husband has his third of 4 finals tonight and wouldn't be home until 10 p.m., I thought I'd try a test batch.

*** Note: The recipe was originally posted on I Love Texas Recipes Facebook page in December of 2013. 

It was quite simple ...

Ingredients:


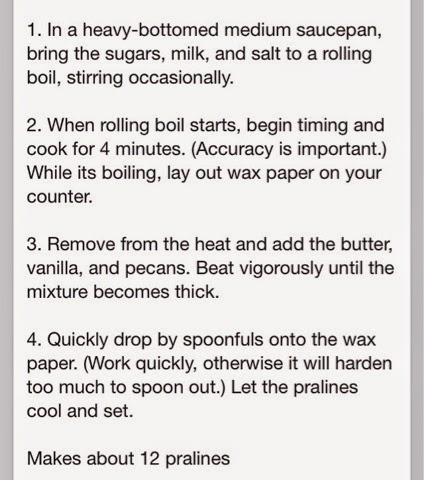
Directions:


I had a lot of fun, despite my 4-year-old having a momentary crisis at the "critical" stage (step 4). The whole process was fun, and except for needing a lot of pecans, I had most of the supplies in my "winter" pantry.

Here's a look at my adventure ...


So really the only thing I changed was using wax paper. There is very little that I use wax paper for because most times you can substitute The Appliqué Pressing Sheet by Bear Thread Designs. While the craft sheet was originally created for fusible appliqué, its non-stick surface has also made it a interchangeable tool for other crafts and cooking.

The Appliqué Pressing Sheet comes in 3 sizes and you can special order a specific size as well. Since my parents' own the company I get leftovers, so as you can see, I have a roll of small pieces. These 3 pieces are slightly longer in width than a butter knife, so I have to us several. 


I spooned the mixture onto the sheet and let them cool for about an hour for the first batch, because I had to make dinner. The second batch was plated after about 30 minutes and sent next door when she brought over Lil Monkey's Christmas gifts we'd been hiding there.


Both batches made 14 Pralines each. When it came time to plate them, they just slid right off. I liked the sheet was study enough so that I could lift it up and check to see if they had cooled all the way though.


Then, I wrapped the extras for my sister-in-law and put them in a container that I am sure she will agree is too small! It only held 8, so I guess I'll put some on a holiday plate for her as well. I'm officially the favorite sister-in-law, at least for now.


** Note: Is The Appliqué Pressing Sheet has been stored rolled, as above, lay it on the work surface with direction of roll facing downward. 

** Note: Once The Appliqué Pressing Sheet has been used with food, it cannot be used on craft projects. 

Until our next cup of tea ...


Friday, December 5, 2014

All That Glitter Isn't Gold ...

I wonder how long it will take me to write this post, because I literally have glitter everywhere on me ... hands, legs, face ... even my eyes! There's like this little glimmer when I look around, maybe its on my eyelash ...

Well, tonight (last night once this posts), I spent the afternoon and part of the evening making pretty, little glittery ornaments for my Pink Christmas tree. Once day, when we finally have a place for this second tree, it is going to be decked out in all sorts of shiny homemade ornaments. 

Last weekend, I braved the after Thanksgiving shopping madness (on Sunday) after my son's play date. It was a well thought out plan because I knew he'd be tired and sit in the cart and play with his LeaPad. I managed to get quite a few things onsale or with coupons. One of them was a variety of mismatched cardboard Christmas ornaments. 

Tpday, I decided to get started on decorating two shapes, the stars and a dreidel sort ofshaped ornament. The plan was quite simple, I would use a paint brush to spread glue onto the ornaments and them sprinkle with glitter and let dry, then do the otherside. It wasn't so much the technique I was using, but the work-surface.

You see that brown matt laying under my supplies, that is a Grip-n-Press by Bear Thread Designs. They actually have a variety of work-surface protectors, but this one was the best choice for this project.


First, the bottom has a non-skid material on it which keeps it from moving around on my table. That is quite important with a curious 4-year-old wandering in and out of the kitchen while I worked. The top side is a non-stick surface. Since nothing sticks to the surface, I poured my glue right on top of it, like a paint palette. Once I'm finished, I can just wipe up any excess with a wet paper towel (or baby wipe) and lt it air dry. Even dried glue/paint/etc wipes right off! Love it!!


To make the ornaments, I just "painted" glue on a small section of the ornaments, then sprinkled glitter over it.


Wht a fun and quick project! The silver stars turned out better than I imagined, and the pink will have a second layer later since I got a really light colored and fine textured glitter. Its a baby pink and the brown cardboard shows through. 

Later, after they dry completely, I will cover with a resin or other protecting agent to make sure the glitter doesn't fall off.

Until our next cup of tea ...


Wednesday, December 3, 2014

Crafty Kid: Passing the Christmas Torch

Yesterday my husband had his first law school final for the semester, so he didn't get home until nearly 9:30 p.m. After dinner, the Lil Monkey started to get antsy, so I enticed him to clean up so we could make some Christmas ornaments for our holiday gifts (and a few for the tree). 

Now, I am a self-diagnosed with control issues when it comes to crafts and creative stuff for sure. So, I really have to remind myself that doing crafts with him does not have to be picture perfect or even make sense some times. It's about being creative and having fun. He's 4, so there is lots of time for people to put him "in a box" or give him parameters later.

Earlier this week, we had tried to make some reindeer ornaments but didn't get too far because he was getting frustrated with the glue no drying instantaneous! This time, we were making wreaths, from a prepared kit, just like the reindeers. This time, I set him up at the kitchen table, with all of the pieces sorted and said we were going to do an assembly line - I would tie the string on foam wreath and then he could glue the buttons on them. Later we would tie the bows and glue them on. He had no idea was assembly-line was, but said we were working like elves. Ok, elves it is. 

We got quite a few of them done in that last hour before bed time. He event invited his imaginary friends, Stella and Sam, to help us. Then he helped them with the glue and buttons later on so that they would have some ornaments too.


I guess tonight we may try to get some more done. It was fun working on this project and watching him decided what "patterns" he wanted to use for the red and white buttons. We talked about taking the "centers" that we pulled out of the middle and making about half of them Mickey Mouse themed, but we'll see. I'm not sure if he will want to put a photo in the center or not. I'll let him decide when we get to that stage.

While we are on the subject of kids crafts, the Lil Monkey also made these ornaments with my sister, Moo-Moo, when we were visiting my family last weekend. 


I encourage you crafty moms to include your children in activities. Sometimes it hard, I'll admit, because I want something to be perfect. But I always try to keep a spare project nearby so that if he does try to help on a not-so-kid-friendly project, I can give him something to do to keep his creativity inspired.

Until our next cup of tea ...