Today my husband had class in the morning followed by drill at the Army base. I decided today was the perfect time to get the Lil Monkey and make Vanetine's Day treat for his school friends.
This year was a little harder, because he has a number of kids in his class with dietary restrictions. Some have allergies, but mostof them are cultural or religion-based restrictions. So this year, we decided to go the non-food route.
I'd see the melted crayons made from broken colors, so I thought that my nerves could handle him doing something that involved using the over because he will be 5 on Monday and has learened to stay away from the oven if I tell him too. In the past, my concern was that his curiosity would rule out and he'd try to peek.
The project itself was pretty fun, though not fast. The supplies included:
- various colors of crayons
- small cups (for sorting)
- mini muffin tin or non-stick baking cups
- cooling sheet (Applique Pressing Sheet)
Step 1: First I seperated the colors in cups by color families. Reds, blues, organges, yellows, etc.
Step 2: After the colors were sorted, I peeled the paper off and broken them into small pieces. Usually about 5 pieces for each crayon. The brand I used was Playskool colors. I was able to get 36-pack at Dollar Tree for $1 each. I used 4 packs and made about 45 pieces.
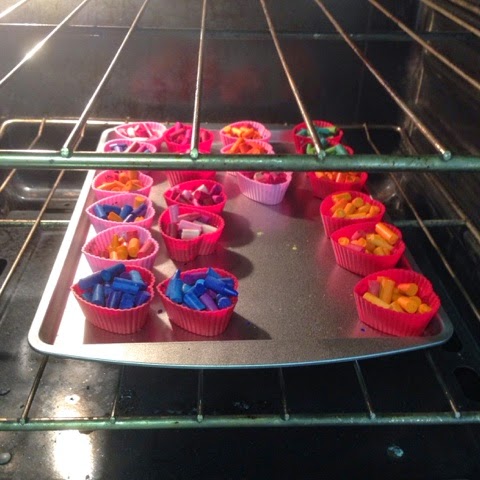
Step 3: The Lil Monkey helped layout our silicone heart shaped cups on a baing sheet and started filling them with the broken colors. Some were mixed colors, some were just colors in the same "family". We filled the cups to the top because they lose volume once they melt.
He was faster than I was unwrapping them, so he started to play around. This was his sad face because he ran out of broken colors while I was unwrapping them. I guess I wasn't fast enough for him. He was playing around pretending he was going to eat them, then I hear, "Yuck! I think I actually ate some!" Ha! I was laughing so hard!
Step 4: After we filled all the cups we placed them in a preheated oven at 275 degrees for 10-15 minutes. Some of the cups were filled more than others so I checked at about 10 minutes and there was still some visible bumps and left them in a few minutes longer. It just depends on if you want them completely melted.
Step 5: After removing from the oven, we let them cool 30 minutes in the cups, them placed in the fridge for another 10 minutes. If you put them directly in the fridge to cool, the rapid temperature change can make some of the colors crack.
Step 6: We carefully removed them from the silicone cups.
When we took them out of the oven they had a clear coat that I thought was water, but ince they fried, I realized from the nuted colors that it was the wax in the colors. Once we took them out of the silicone cups, the other side was brightly colored.
As you can see, we made quite a few.
The Lil Monkey was so excited with this project. I think we will definitely do something again soon, and this one is going in the books as a redo as well. Between the $4 for colors and the $1 Valentine's treat bags we put them in, we've had quite a budget-friendly project. I'll add stickers or cards with a note from him and be ready to pass out the treats later this week.
Until our next cup of tea ...


No comments:
Post a Comment